How To Install A MaxxFan Deluxe In A Toyota Coaster – Step-By-Step Instructions Made Simple
When living in an enclosed living space like a Toyota Coaster or similar, an exhaust fan is an important addition to the home! Without one, not only can air get stale, but moisture can build up in the space causing potential health problems such as mold and more.
The MaxxFan deluxe is an excellent product for the job, and thankfully installation is pretty easy overall.
In this guide, we are taking you step-by-step on how to install a MaxxFan Deluxe on a Toyota Coaster. These instructions can also assist you with other exhaust fan installations in different vehicles, such as vans.
Supplies you will need
To install an exhaust fan in a Toyota Coaster you will need:
- Exhaust fan, we recommend MaxxFan Deluxe (Comes with screws)
- Jigsaw Cutter
- Drill
- Metal drill bits
- Pencil
- Measuring Tape
- Masking Tape
- File
- Plastic Bag
- Vaccuum, dustpan and brush for clean up
- Safety gear (Protective glasses, Mask and Ear Protection)
- Bitumen tape
- Roof and Gutter Sealant
- Sikaflex Glue
- Timber for a wooden frame reinforcement

How to install a MaxxFan Deluxe in a Toyota Coaster
Step 1 – Choose where it’s going
First, determine where you want to install the campervan fan on the roof of your vehicle. Things to consider are that it may be best placed near wet areas which can have steam. For example, the kitchen or bathroom.
Important: Ensure that you check that this area on the roof won’t be obstructed by solar panels, roof racks etc. You want to choose an area that is as flat as possible. Toyota Coaster roofs are notoriously curved at the edges, and the exhaust fan cannot be on the curved part of the roof.
Clean this area with acetone in preparation as you will be cutting next!

Step 2 – Build the frame for the exhaust fan in preparation
As Toyota Coasters and other vans have very thin metal ceilings, it’s important to reinforce the exhaust fan with a timber frame. This is so you have something to screw into as the thin sheet metal is not enough.
To create this frame, cut four pieces of 2×2 inch wood with measurements of 400mm X 400mm to make a wooden frame for the exhaust fan.
You will need to check this compared to your space. It will most likely need to be modified.
Glue the pieces together using liquid nails or very strong glue, and clamp them together overnight to ensure they stay in place.
Important: Drill a hole in preparation to run the wires through this frame later!

Step 3 – Measure, mark and prepare to cut the roof
Use a measuring tape and pencil and mark a 400mm X 400mm (The size of a MaxxFan Deluxe) square on the interior and exterior of the roof at the chosen location.
Line with masking tape in preparation and redraw the lines to ensure you can clearly see them.

Next is to drill four holes, one at each corner of the square. Use a small metal drill bit to drill pilot holes at each corner of the square. Now choose a drill bit that is large enough to fit your jigsaw cutter blade. Screw bigger holes at each corner of the square, using the pilot holes you have just drilled.

Important: When you cut into the roof of your vehicle shards of metal will fly out. These shards can rust your vehicle. To avoid this, you can line the underneath of where you will be cutting the hole with a plastic bag. Sticky tape it to the ceiling of your van. You will also need to clean your roof after to ensure no shards are left behind.

Step 4 – Cut the hole
Using a jigsaw, cut out the square marked on the roof. Make sure you are using a metal jigsaw blade. Hold it tightly to prevent it from wandering.
As you cut each side of the square you can quickly re-stick it with masking tape to stop it from falling through. Once you are finished remove the piece of the ceiling and dispose of it.
Step 5 – File down the cut metal and rust and protect the area
Use a metal file plus fine sandpaper to smooth the edges of the cut-out hole on the roof. Clean the area around the cut-out hole inside and outside the van using isopropyl rubbing alcohol to remove any dirt and metal filings.
Apply rust protect primer and rust protect paint on the exposed metal around the cut-out hole to protect against future corrosion.

Step 6 – Waterproof and seal the exhaust fan rim and glue the timber frame
Apply strips of bitumen tape (Waterproofing tape) on all four sides around the cut-out hole on the roof to smooth out the surface and waterproof the area.
Apply a thin bead of Sikaflex sealant/adhesive to the inside of the Maxxfan plastic backing flange. Flip the plastic backing over and press it onto the hole in the roof, ensuring it is evenly distanced from the edges.
Apply sealant around the edges of the mastic for extra waterproofing.

Step 7 – Screw down the rim of the exhaust fan into the timber frame
Screw the Maxxfan Deluxe plastic backing flange into the wooden frame using the self-drilling screws provided. You may need to get extra screws depending on your wooden frame.
Apply silicone to the rim of the fan on the exterior of the vehicle, as well as a bead of silicone on each screw. This will ensure that no rain or water can get through those holes.
Clamp it down overnight.

Step 8 – Put the exhaust fan in
Place the body of the Maxxfan Deluxe into the plastic rim which is now attached to the roof and connect it using the four screws provided.
Attach the plastic trim to the inside part of the fan by fitting it into the frame with four screws beneath.

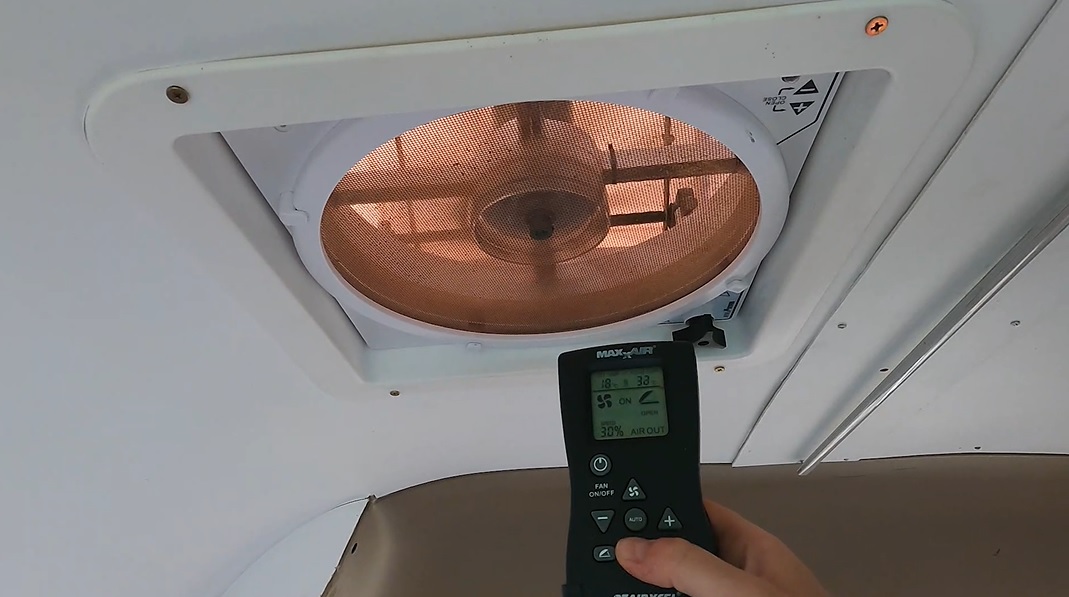
Step 9 – Wire it up and test the fan
Test the installation by wiring up the fan’s positive and negative connections and using the remote control to switch on the fan and adjust its speed settings.
And that is it, overall we have been so pleased with our MaxxFan Deluxe. The remote control function is excellent, and it is so quiet, and never disturbs the area for us.
Good luck with your installation, let us know how you go below in the comments!
Our Essential Travel Toolkit
🤩 Wise Card – Online bank to hold money in different currencies worldwide and lowest fees in the market! (FREE debit card here)
🤩 Trip.com – Consistently great accommodation and hotel deals.
🤩 Hostelworld – Looking for the cheapest accommodation? We especially love the “book now, pay later” feature.
🤩 Discovercars.com – Best range, super easy to compare prices rental car and motorhome prices.
🤩 Viator.com – Easily book tours and experiences at the lowest rate. Great selection all over Australia.
🤩 Tripadvisor.com – Other than our website…😉 the best place to find things to do
🤩 Airalo – eSIM store that solves the pain of high roaming bills by giving travelers access to eSIMs (digital SIM cards).
🤩 Caravan RV Camping – Traveling Australia in a van, caravan or bus? This is the best place to get all your gear.